
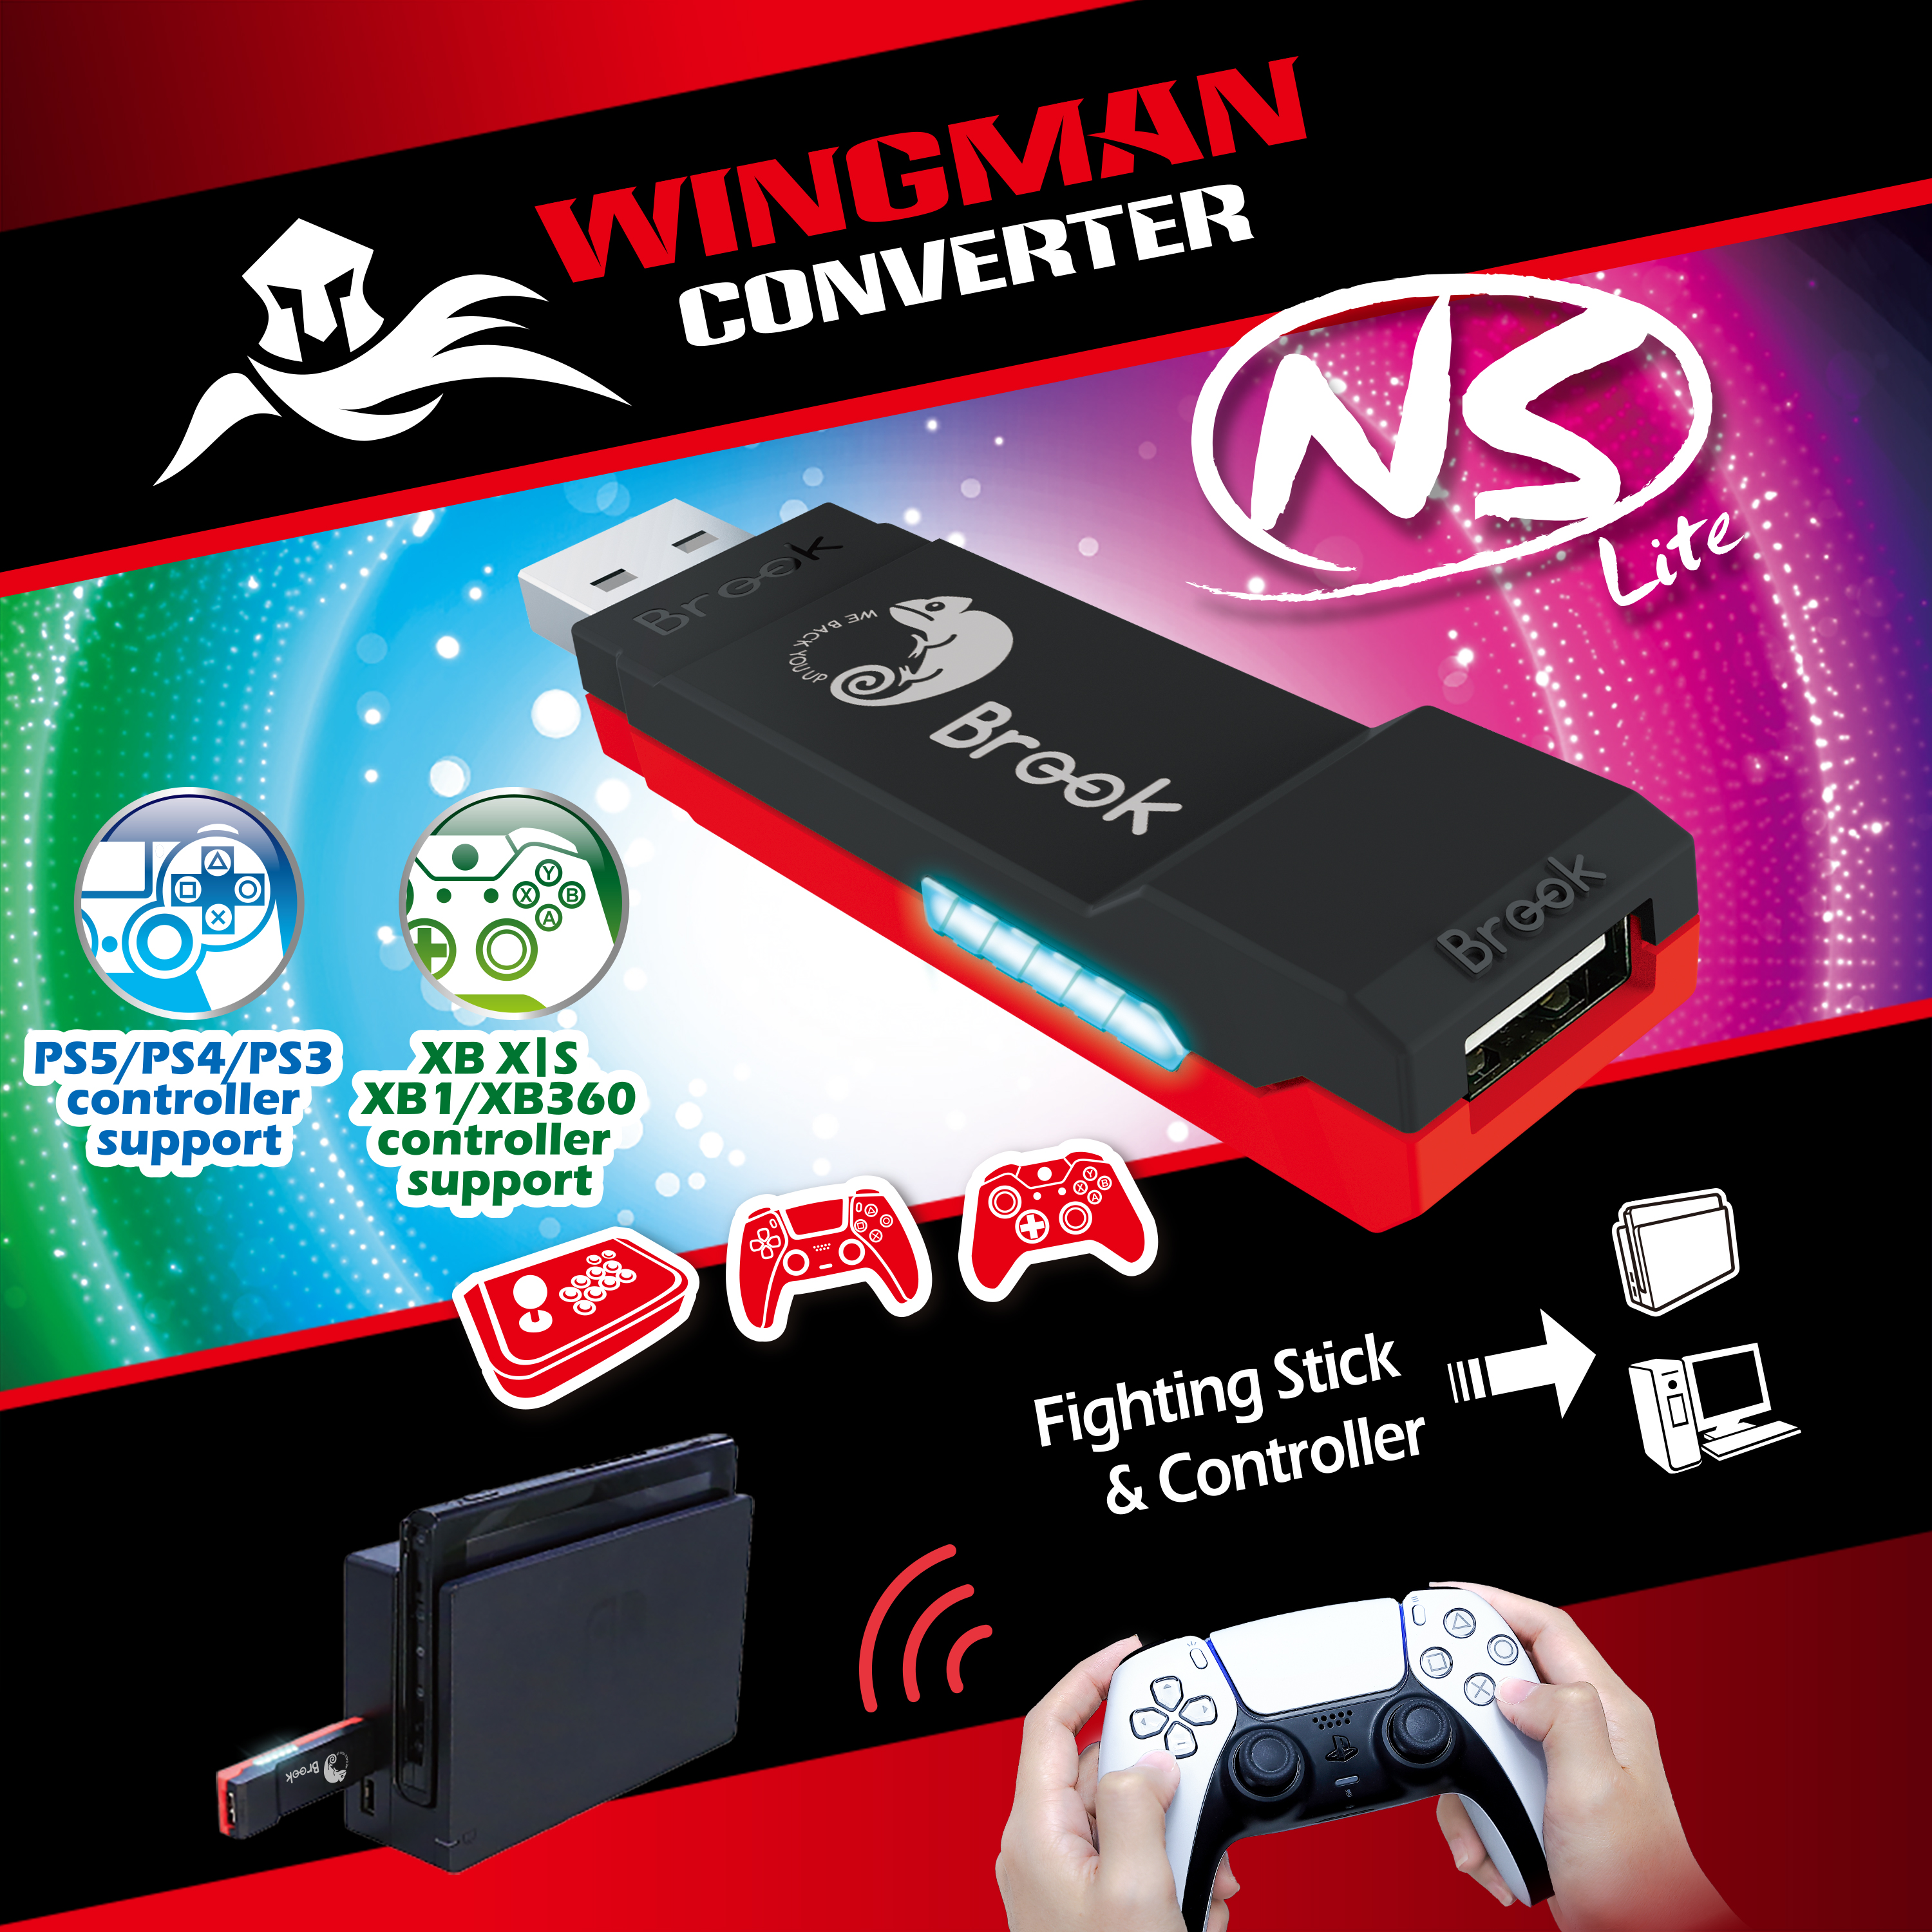
Wingman NS Lite
Unleash Joy, Lighten Costs! Embrace Switch Gaming Freedom with Wingman NS Lite
Use PS / Xbox controller and arcade stick on your Switch / Switch 2.


Introduction
Yes, of course you love Switch / Switch 2 and there are so many great games on it, don't you?
But for those of you who are keen to explore the world of gaming, perhaps you'd prefer to use your usual Xbox or PS controller?
Wingman NS Lite, the answer to your cravings.
Video
Features
Unboxing
*Here is an unboxing video for the Wingman NS. Most of the features of the Wingman NS Lite are similar to the Wingman NS. Wingman NS Lite supports wireless XSX|S, Xbox Elite 2, and Xbox One S controllers, it also supports Macros and Multiple setting storage functions .
.jpg)


Connecting to the Device
Use for the first time, go to System Settings → Controllers and Sensors, and turn ON Pro Controller Wired Communication.
-
Insert Wingman NS Lite into the Switch console USB port. Slow blinking of the Blue LED indicates that the connection to the console is successful.
-
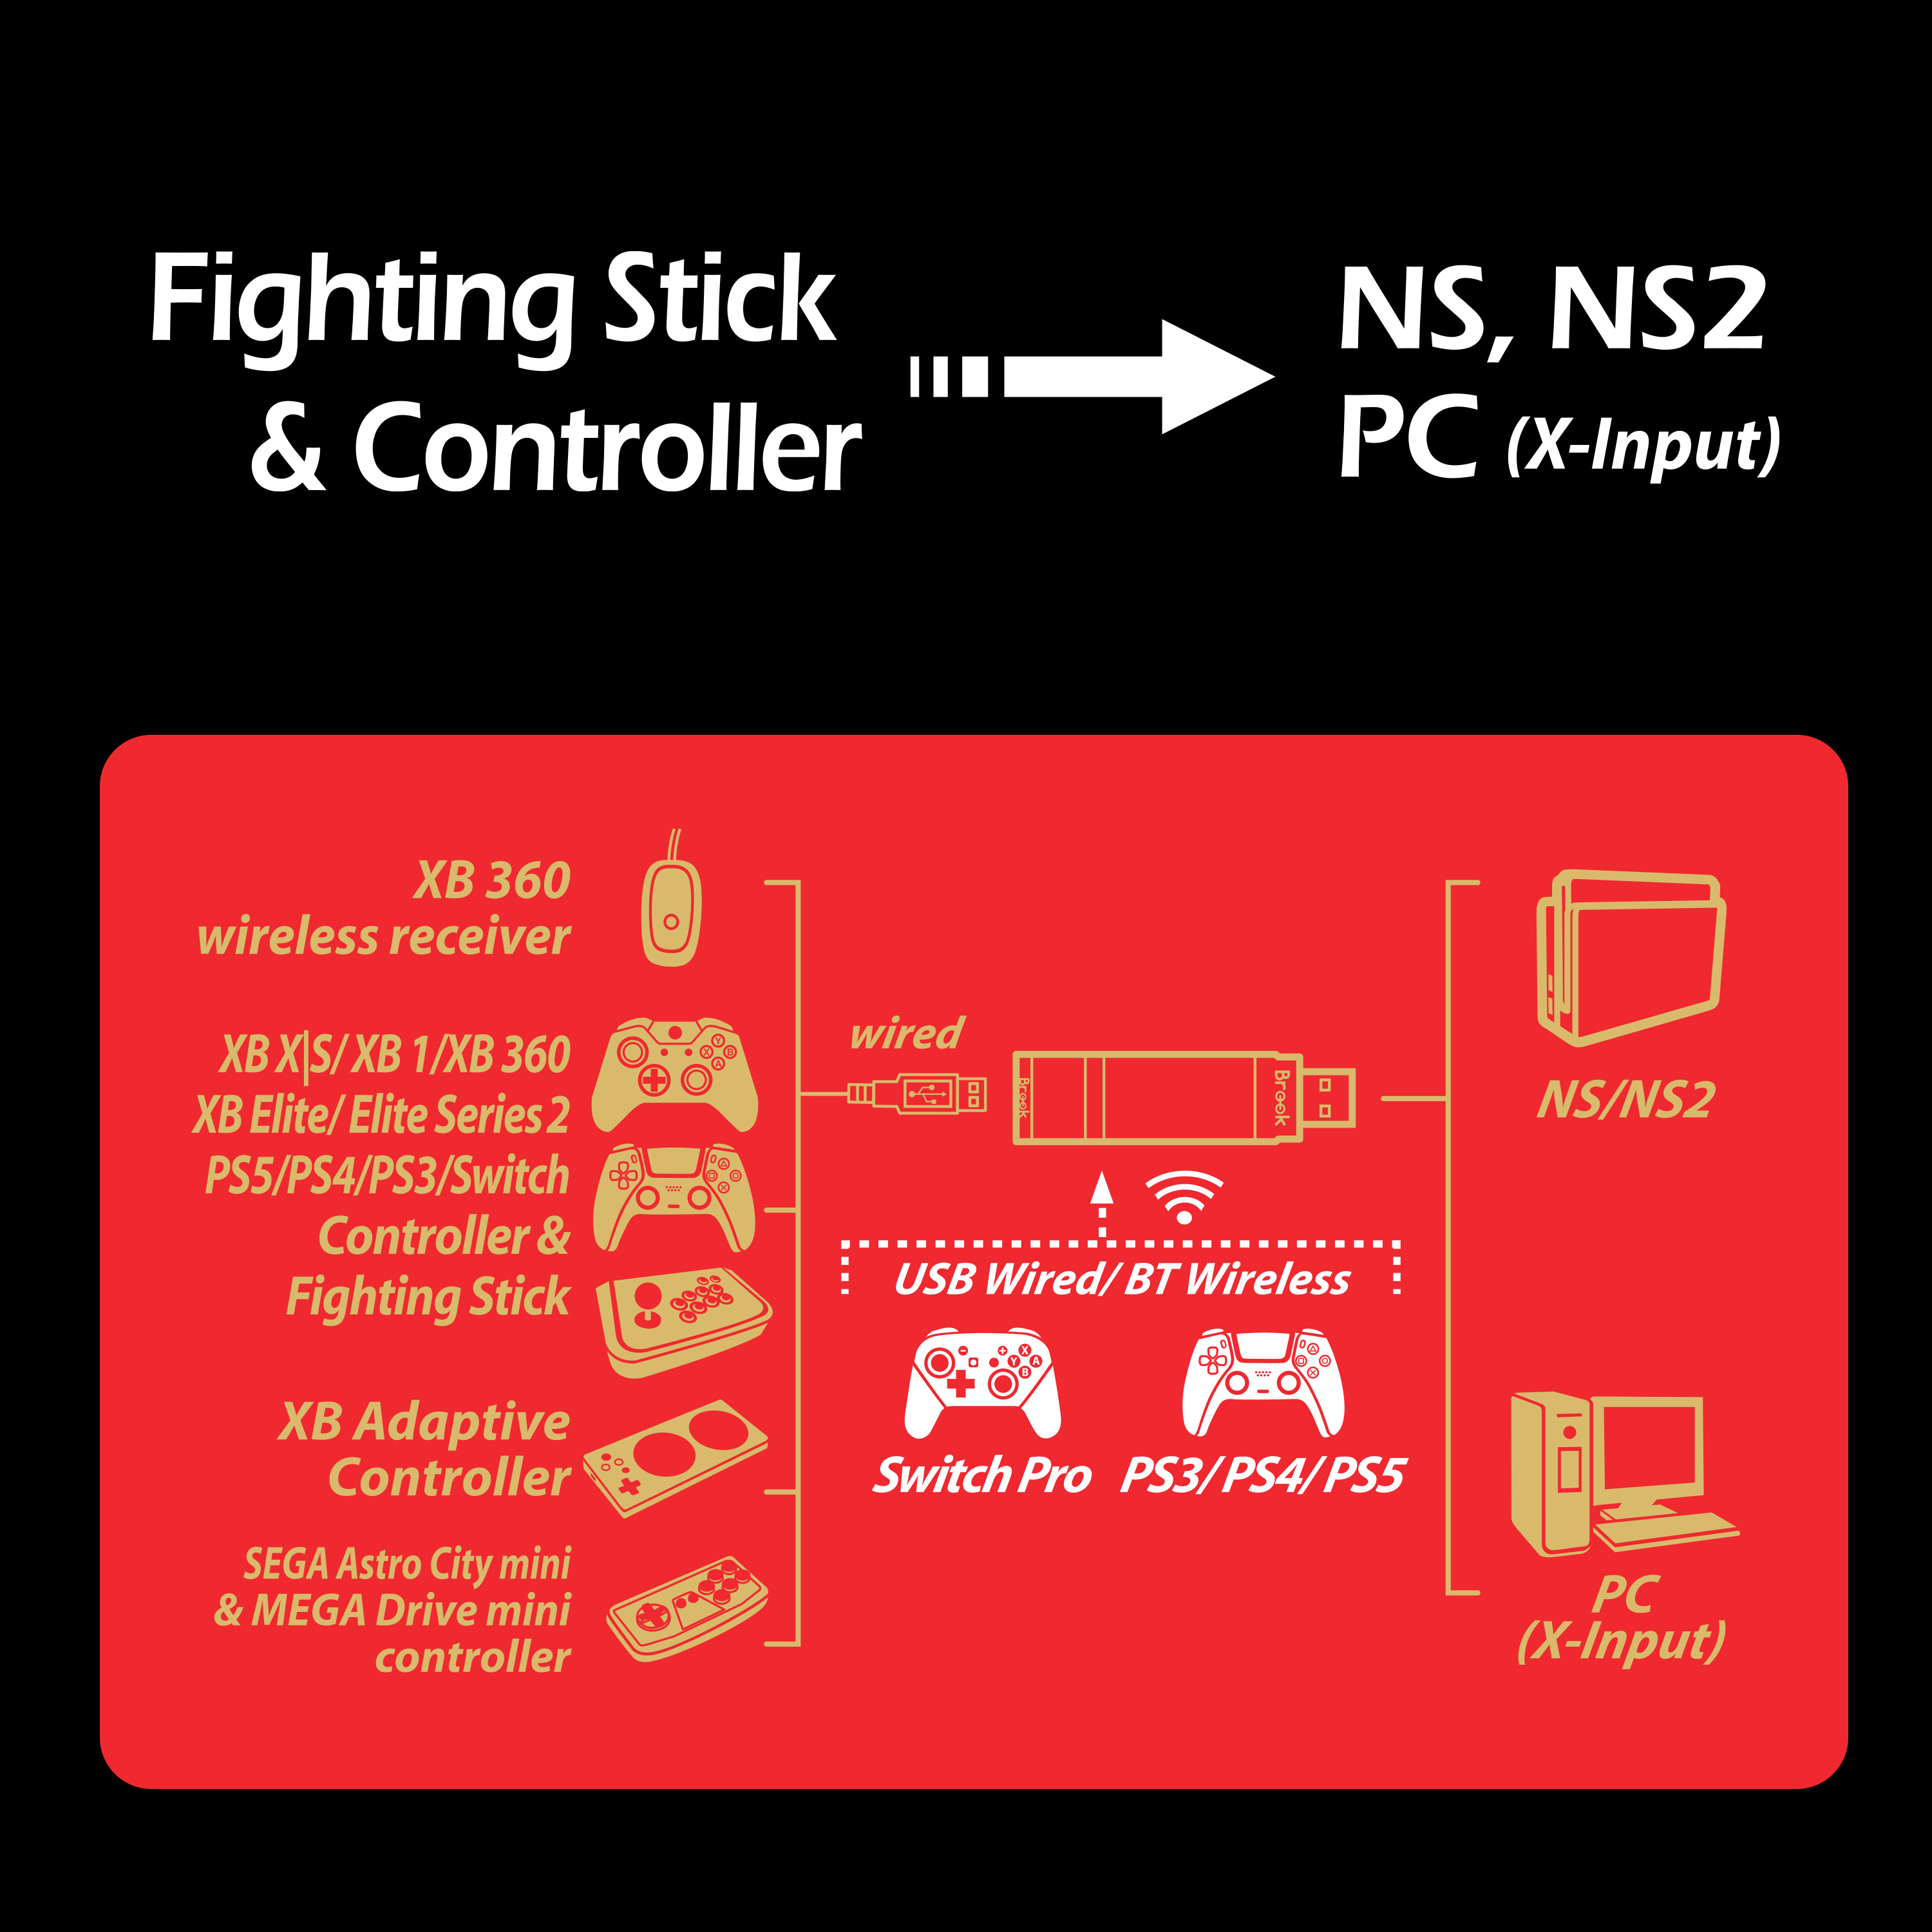
Wired Connection:
Connect the Xbox 360 / Xbox One / Xbox One Elite2 / PS3 / PS4 / PS5 / Switch Pro wired controller or game pad to Wingman NS through the USB port.
Using a X360 wireless controller:
Simply connect the wireless X360 wireless receiver to the Wingman NS Lite through the USB port.
Using PS3 / PS4 / PS5 / Switch Pro wireless controller:
After completing the connection according to the instructions of the Wired Connection, remove the USB cable, and then wake up the PS3 / PS4 / Switch Pro wireless controller.
-
Check whether the two Blue LEDs at the sides of the Wingman NS Lite are permanently on. This indicates that the connection is completed.
.png)
Connection Pairing Supplementary Instructions
Holding the LED buttons on the two sides of the Wingman NS Lite for 1 second will activate wireless connection pairing mode. The Wingman NS Lite will engage in pairing with surrounding Bluetooth devices. The pairing mode will end if:
- The connection pairing with the wireless controller is successful.
- The connection pairing is unsuccessful after 1 minute.
- The LED buttons are held for 1 second.
LED
|
Lighting |
Status |
|
Blue LED |
The connector and the device are currently connected. |
|
Blue LED Slow blinking (Once every two seconds) |
Wired device is not connected Wireless device is searching for connection… |
|
Blue LED Fast blinking |
Wireless connection mode is ON Searching for pairing device… |
|
Red LED Blinking |
Turbo-Remap button is being pressed |
|
Red LED Permanently on |
Entering Turbo-Remap Settings |
Turbo Setting
The following instructions are based on the Xbox One controller. For those using other controller, please refer to the Corresponding Buttons List.
Turbo Function Settings
STEP01.
Press Xbox GUIDE button & VIEW button to enter setting mode.
STEP02.
Hold VIEW button & tap the button which you want to set up Turbo function.
STEP03.
Press MENU button to save the setting.
STEP04.
Press Xbox GUIDE button to save the setting.
Cancelling Turbo Function
STEP01
Press Xbox GUIDE button & VIEW button to enter setting mode.
STEP02
Press MENU button & VIEW button to cancel Turbo setting.
STEP03
Press Xbox GUIDE button to exit setting mode.
Turbo Function Settings
Cancelling Turbo Function
Remap Setting
The following instructions are based on the Xbox One controller. For those using other controller, please refer to the Corresponding Buttons List.
Button Remap Settings
STEP01.
Press Xbox GUIDE button & MENU button to enter setting mode.
STEP02.
Press the button which you want to assignment.
STEP03.
Hold VIEW button & press the buttons which you want to Remap.
STEP04.
Press MENU button to save the setting.
STEP05.
Press Xbox GUIDE button to save the setting.
Cancelling Button Remap Settings
STEP01.
Press Xbox GUIDE button & MENU button to enter setting mode.
STEP02.
Press MENU button & VIEW button to cancel Remap setting.
STEP03.
Press Xbox GUIDE button to exit setting mode.
Button Remap Settings
Cancelling Button Remap Settings
Where to buy

Official 
![]()
![]()
![]()
